openHAB integration
openHAB supports MQTT autodiscovery using the Homie convention. Make sure MQTT is configured properly and that Homie autodiscovery is enabled (see MQTT).

Unlike Home Assistant, openHAB does not come with a vacuum widget out of the box. It does, however, allow adding custom widgets for complex devices.
A collection of custom widgets, rules and integrations for openHAB is available on GitHub: github.com/Hypfer/Valetudo-Openhab
This document tries to explain in enough detail how to add a Valetudo robot to openHAB with the goal of minimizing inconsistencies between different users setups. This will make it easier to share custom integrations among the Valetudo community.
{% include alert.html type="note" content="This document applies only to openHAB 3.0 and newer. openHAB 2 and 1 are out of scope. Homie must also be enabled in Valetudo.
" %}
Adding the robot
- Before starting, go to Valetudo and refresh the status, navigate a few pages. This will ensure that all MQTT topics are correctly populated and ready for openHAB.
- You need to install the official MQTT binding if you don't have it installed already: you can install it from Settings → Add-ons → Bindings -> [+ button] → MQTT Binding.
- Create an MQTT broker by navigating to Things → [+ button] → MQTT Binding → MQTT Broker, then configure the same broker that you configured for Valetudo.
- Go back to Things → [+ button] → MQTT Binding, but this time, if you configured the broker correctly, you should]
find your Valetudo instance on top, with a subtitle
mqtt:homie300. Choose a unique name for your robot. - Now navigate to "Model" {% include alert.html type="tip" content="If you haven't configured your semantic model, you should probably give it a shot, it simplifies setting up devices by orders of magnitude. Docs." %}
- Select the room you want to add your robot to, then click "Create Equipment from Thing" and select your newly created Valetudo Homie thing. Fill in the name, etc, then scroll towards the bottom before saving.
- Enable and configure the channels you want to import from the vacuum. You don't have to select all of them, and you don't need to add all the items you configure to your semantic model (to not add them to the model, set the \"Semantic class\" to \"None\"). The table below shows the recommended channels to enable and suggested parameters.
{% include alert.html type="important" content="Do not change the \"Name\" fields if you want to use or publish custom widgets and integrations.
" %}
{% include alert.html type="note" content="For channel Map you need I Can't Believe It's Not Valetudo with \"mqtt.publishMapImage\" and \"mqtt.publishAsBase64\" set to \"true\". " %}
| Channel | Type | Category | Semantic class | Semantic Property | Notes |
|---|---|---|---|---|---|
| Dust bin | Switch | Point | Presence | ||
| Water tank | Switch | Point | Presence | Optional | |
| Mop | Switch | Point | Presence | Optional | |
| Fan speed | String | fan | Setpoint | Level | |
| Water grade | String | water | Setpoint | Level | Optional |
| Status | String | Point | None | ||
| Status detail | String | Point | None | ||
| Battery level | Number | batterylevel | Point | Level | |
| Battery status | String | battery | Point | None | |
| Operation | String | Point | None | ||
| Clean segments | String | None | None | Optional | |
| Locate | String | Point | None | Optional | |
| Map | String | None | None | Change item to image type | |
| Map segments | String | None | None | Optional |
{% include alert.html type="tip" content="If you need to add more channels later you can always select your vacuum from the semantic model, then click \"Create Points from Thing\".
" %}
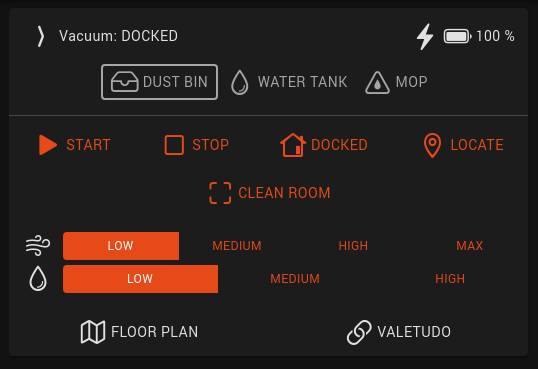
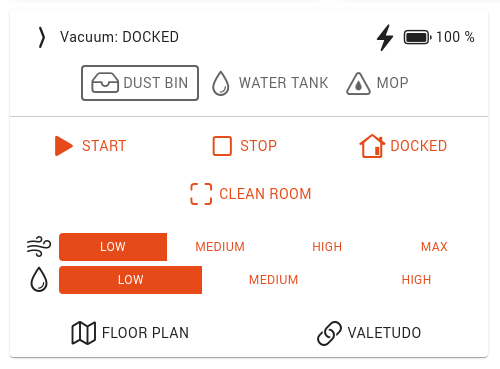
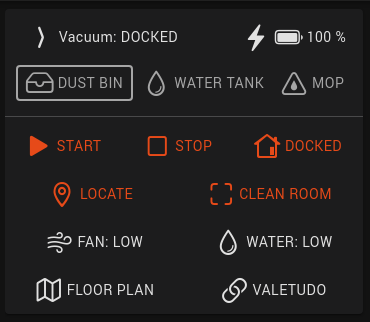
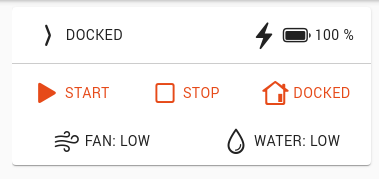
- Once the vacuum is added and linked, we are ready to add the custom widget. Go to Developer Tools → Widgets → [+ button] and paste the widget code at the end of this page.
You can test it by selecting "Set Props" on the bottom, and adding the settings. You can also change it as you wish.
Refresh Homie channels after a Valetudo upgrade
Due to a bug, openHAB will not register any new channels added after first setup, such as after an upgrade that adds new features (see openhab/openhab-addons/#7467).
A workaround is to delete the thing and recreate it with the same name. This will not affect item links, widgets or anything.
- Navigate to Settings → Things → [your robot thing].
- In the Code tab, copy the configuration and save it for later
- Click on Delete Thing at the bottom of the page.
- In the things page, add a new thing → MQTT Binding
- The vacuum won't be discovered since you just deleted it. Under "Add manually" select "Homie MQTT Device"
- Now, copying from the configuration you saved earlier, fill in as follows:
- UID: the last part after the last colon of the
UIDfield in the config - if your UID in the config wasmqtt:homie300:mosquitto:robotyou have to typerobot. Ensure that the generated "Identifier" field matches the old one. - Label:
label - Bridge: click on "Bridge" and select your MQTT bridge thing
- Device ID:
configuration.deviceid - MQTT Base Prefix:
configuration.basetopic - Double check that you didn't mistype any values and save
The robot thing should now appear, the old channel links should still be attached, and the new channels should be there.
If Valetudo decided to rename some channels (for example: water grade and fan speed properties will change from
intensity to preset after v2021.04) they won't be relinked automatically.
To relink them:
- Open your newly recreated thing
- Navigate to the Channels tab
- Expand the items that were unlinked
- Select "Add link to item..."
- Ensure that the option "Use an existing item" is checked
- Click "Item to link" and assign it back to the previous item
Setting custom options, friendly names and order
You will likely notice that options for fan speed and water grade are all lowercase and in a random order. Also, you will see that Clean segments does not have any options.
This is easy to fix from settings.
- Go to Settings → Items
- Find the item you want to change (fan speed/water grade/clean segments)
- Click Add Metadata and select Command Options
- Add your custom options in the
command=Friendly nameformat, one per line. For example, for fan speed presets:
low=Low
   medium=Medium
   high=High
   max=Max
For "Clean segments":
10=Kitchen
   17=Living room
   11=Bathroom
   13=Bedroom